
Assign and update a ticket

Update a ticket from its conversation view. Quick status choices keep the request moving, while the details panel controls ownership, priority, client context, department, tags, privacy, and more.
Who this is for
Section titled “Who this is for”Agency team members who triage and own tickets. Requires View Tickets to open the ticket and ticket management access to change it.
Before you begin
Section titled “Before you begin”- Find and open the ticket from Tickets ( /tickets/inbox (opens in new tab) ).
- Confirm you are working in the correct agency workspace.
- If the ticket needs a different inbox, make sure you can access the destination inbox.
Change status from the conversation
Section titled “Change status from the conversation”Below the latest conversation item, AgencyTitan may show Need to update the status? with the next useful status choices.
- Review the latest customer message or internal note.
- Select the status that matches the next state, such as Open, Waiting on Client, or Resolved.
- Confirm the selected status appears on the ticket.
Status names are controlled in ticket settings, so your agency’s choices can differ. Use the details panel when the status you need does not appear in the quick choices.
Open the details panel
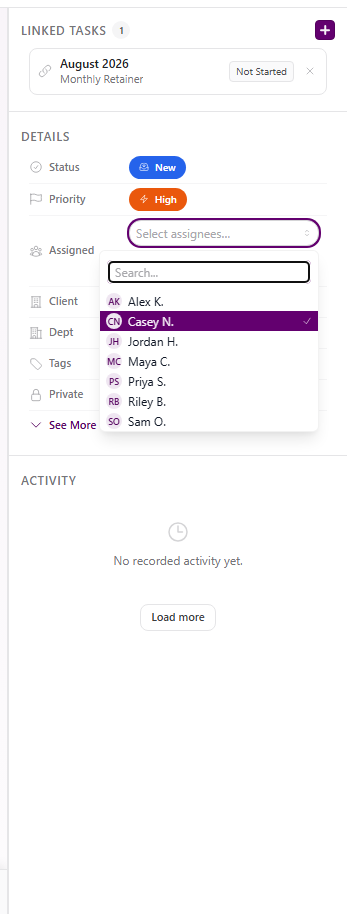
Section titled “Open the details panel”Select Show details panel in the ticket header. The panel shows:
- Status
- Priority
- Assigned
- Client
- Dept
- Tags
- Private
Select See More for channel, inbox, ticket number, created date, first-response SLA, and resolution SLA.
Assign the ticket
Section titled “Assign the ticket”-
In the details panel, select Assigned.
-
Search or choose one or more eligible team members.
-
Close the picker after the selection saves.
View full size
Use Run auto-assignment beside Assigned when you want AgencyTitan to apply your agency’s assignment settings. If automatic assignment is off or no eligible person is available, the ticket remains unassigned and AgencyTitan explains why.
When AI Smart assigns the ticket, expand AI Insights at the top of the ticket to see the AI assignment section. It shows the assignment rationale, including the agency assignment rule that drove the choice.
Update status and priority
Section titled “Update status and priority”- Select Status or Priority in the details panel.
- Choose the new value.
- Confirm the pill updates.
Use status to represent the ticket’s lifecycle. Use priority to represent urgency. SLA targets can vary by priority when your agency configured them in ticket settings.
Add ticket context
Section titled “Add ticket context”Use the remaining details fields as needed:
- Client links the request to the correct client record.
- Dept routes ownership to a department.
- Tags add ticket-specific labels.
- Private restricts the ticket according to your agency’s privacy rules.
The Activity section records changes. Linked tasks appear above DETAILS when the ticket is connected to delivery work.
Move the ticket to another inbox
Section titled “Move the ticket to another inbox”- Select Move to inbox in the ticket header.
- Choose an inbox you can access.
- Confirm the move.
Moving an existing ticket is different from intake routing. Intake routing applies only while a brand-new email ticket is being received. See Create intake routing rules.
Expected result
Section titled “Expected result”- Status and priority pills show the selected values.
- The Assigned field shows the current owners.
- AI Insights shows the rationale for an AI Smart assignment when one is available.
- Client, department, tags, privacy, and inbox reflect your changes.
- The Activity timeline records the update.
Troubleshooting
Section titled “Troubleshooting”| Symptom | Likely cause | What to do |
|---|---|---|
| Detail fields do not open | You have view-only access | Ask a workspace owner to review your ticket management permission |
| Team member is missing from Assigned | They are outside assignment eligibility or inbox access | Review ticket assignment settings and the inbox visibility |
| Auto-assignment finds no one | Mode is off or no eligible person is available | Assign manually or update Auto-Assignment in ticket settings |
| Expected status is missing | It is not configured for your agency | Review Ticket Statuses in ticket settings |
| Inbox move is blocked | Destination is inactive, restricted, or unavailable | Choose an accessible active inbox or review its visibility |
| SLA looks different after a priority change | SLA defaults vary by priority | Review SLA Defaults in ticket settings |
Related articles
 Concept Tickets overview How the Tickets inbox, ticket conversations, assignment, statuses, inboxes, routing rules, and reply templates fit together.
  How-to Find and work tickets Use inboxes, quick filters, statuses, departments, client filters, and search to find and open tickets in the Tickets inbox.
  How-to Reply to a ticket Send a customer reply from the ticket composer, add recipients and attachments, use a template, or leave an internal note.
  How-to Set up a ticket inbox Connect an email or SMS channel in ticket settings and configure visibility, defaults, inbound behavior, and outbound behavior.
  How-to Create intake routing rules Route brand-new email tickets by sender, subject, known-client match, and arrival inbox using ordered ticket intake rules.